Pages

Background

Thursday, February 2, 2012

Cute Scrapbook Paper Pendants

This past summer my Aunt Cheryl opened a quilt shop in Charleston, South Carolina and asked me to make jewelry for her shop! I know that quilters like neat patterns and unique items they can't find anywhere else. I decided to take scrapbook paper patterns to the next level to appeal to her customers!

First you start out with the following items:

1. A pendant/locket, these can be found at hobby lobby or any of your favorite craft stores or online jewelry shops. My favorite online shop is Fusion Beads they always have specials, free shipping and its easy to just buy a couple of things you need.


2. This special Lisa Pavelka Magic Gloss at a local craft store or online. I found mine at Hobby Lobby, but you can also find it on Amazon and other online stores Lisa Pavelka Magic Gloss.

3. Any kind of scrapbook paper that you want! The beauty of this is you can get as creative as you wish with the designs. An all time favorite is the love birds, I bought this at Paper Source.


Directions: 

1. Cut out the scrapbook paper so that it fits snug into your pendant/locket. 

2. Take the gloss and spread it on top very carefully. 

3. Use a toothpick to get any of the bubbles out. Place on a window seal or outside if it is not windy to dry, the sun helps seal and dry the glue. I will say that I had to do this a couple times, because I would get a bubble or dust would get into the glue while it was drying, so just be prepared for that! 

4. After your pendant is finished, hook it onto a necklace and VOLIA you are now wearing a BEAUTIFUL SCRAPBOOK PENDANT! This can also be done with pictures and really whatever you want as long as it's paper.

More to come to with jewelry making, including how to make your own earring backs and much more!!!


Monday, January 30, 2012

Homemade Wine Stopper

Last fall I attended a craft show and saw the most adorable wine stoppers.  After looking at them for a few minutes and contemplating whether or not to spend the asking price of $22, I soon realized they were just drawer knobs and wine corks.  How hard could this be to make? Not hard at all...

Since I made my first homemade wine stopper, I find myself constantly visiting the 'Clearance' section at Hobby Lobby and Home Depot looking for dresser drawer knobs. It's super easy to make and also is a perfect gift for bridal showers, weddings or house-warming gifts! Happy craft time!

*HOMEMADE WINE STOPPER*

Materials needed:
  • Decorative drawer knob (I bought mine at Hobby Lobby on sale!)
  • Rubber cork
  • Screw and screwdriver
  • An open bottle of wine

Step 1:
Use a screw and screwdriver to make a pilot hole
in the center of the rubber cork.


Step 2:
Twist the decorative drawer knob into the pilot hole
until it is flush with the cork.


Step 3:
Pour yourself a glass of wine and put your
new stopper in the bottle!
(now you only drink the whole bottle if you want to...
not because you have to!)


Sunday, January 29, 2012

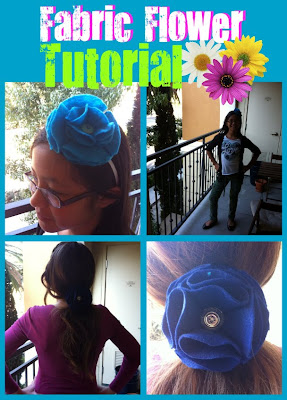
Flower Power - Fabric Flower Tutorial

Pin It


Meet my super cool little sister Athena! This weekend Athena and I had a fun day full of crafting! Athena was super excited when she heard about the blog and wanted to be apart of it. So after getting her mom's permission, we decided to document our crafting adventure.


Some of you may be asking, "how can you two be sisters if you look nothing alike?", well that is because Athena and I are apart of the Big Brothers Big Sisters (BBBS) program. We have been matched together for about a year and a half. Athena and I get together a couple times a month and we have a blast! If you are interested in learning about being apart of this awesome program, check out their website. (most of us Hobbyoholics gals are involved and we LOVE it!)

Now, if you are half the Pinterest fan that I am, then you have seen MANY tutorials on making fabric flowers. This is how I learned to make these flowers in the first place. Here are a couple of my favorite tutorials:
Felt Flower Headband Tutorial
T-shirt Fabric Flower Tutorial
Flower pins

This may be a repeat for some of you, but hopefully I am introducing you to a couple new techniques :)

Supplies:
  • Felt  (Michaels has a variety of colors for only $0.27!)
  • Cute buttons
  • Neddle
  • Thread
  • Optional - elastic, pen, pony tail, etc.

  1. Start tracing circles. You will need at least 5 circles of the same size, but you can make a thicker flower by cutting 7 or 9 circles.
  2. Cut your circles. Try to make them all the same size. 
  3. Fold your circle. First, fold your circle "hotdog" style (or Athena called it "taco")
  4. Keep folding. Now fold the same circle "hamburger" style (Athena called it "pizza", pretty smart girl!)
  5. Clip it. To make things easier, I like to clip all the "petals" with a clothespin (in my opinion, clothespins make most projects easier!)
  6. Repeat. Repeat steps 3-5 for the rest of the circles, but keep one for your base.
  7. Prep for sewing. Again, to make things easier, I like to clip my petals to the base with clothespins. When all the petals are clipped to the base it should look a little like a personal pan pizza (sorry for all the food references, I must be hungry!)
  8. Sew. Sew the acute end of your petals to the base piece of felt.
  9. Add more petals. If you so chose, clip some additional petals and sew. In my experience, I typically only need  4 petals for smaller flowers, 6 petals for medium flowers and 8 petals for larger flowers.
  10. Sew some more.
  11. Add a button. These flowers are pretty stinking cute on their own, but for some extra pizazz add a button.
  12. Enjoy your beautiful flowers! Add these flowers to a headband, ponytail or a pen and enjoy!
These flowers are super fun and easy to make! I made a bunch of headbands using these flowers for Christmas presents last year and they turned out super cute!

I hope you all enjoyed my second post! For my third post, I want to start reviewing some of my favorite crafting tools (they don't call me the "Techy" crafty for nothing) - I am trying to decide between the Silhouette, Cuttlebug, Zap Embossing Heat Gun, and Adobe Illustrator (yes, I call this a crafting tool!). Feel free to cast your vote in the comments section if you so choose! :)


Thanks everyone! More blogging to come!

Sunday, January 22, 2012

Recycled Paned Glass Windows

For the past 6 months or so I have been trying to find neat, old, paned-glass windows to use in various craft projects I have seen on Pinterest and the like. Apparently these have recently become a hot commodity, and the only place I have found them was at the highly overpriced but still terribly lovely antique/thrift store at 50th & Xerxes. Unfortunately, the ones I found were each at least $45, which is far more than I spend on any craft project, especially one that is supposed to be recycled. (I am fully aware that recycled isn't technically synonymous with cheap, but in my brain it is!).


I had an idea of making a window-pane project for my friends Matt and Marie for Christmas, to decorate their new home. They are both Minneapolis natives, love the city, and I found some neat sketches and paintings of different landmarks of Minneapolis (hooray for google image!). It was getting rather close to Christmas and I was very tempted to just pay for the window at Hunt & Gather, but alas, miracle of miracles, I didn't have to! I drove into my garage one day after work and there was a pile of cool old paned glass windows sitting there.


I live in a house/duplex where my landlords live on the first floor and my roommates and I on the top floor. My landlords also own a bunch of other properties, one of which they had recently renovated and apparently kept the old windows. As fate had it, though I never ever see Laurie or Matt (the landlords), I ran into Laurie one morning as we were both heading to the gym. I awkwardly asked what the windows were for and she said she just keeps them for craft projects (she has amazing taste and style, but I had no idea she was crafty!). She asked if I wanted one and told me to pick whichever one I wanted. Score!


Sorry for the book- but that is the main part of this story. I wiped down the window and decided I liked the rustic look and not to paint it or anything. I printed off pictures (standard HP color printer, printed on heavy cream cardstock) of various Mpls landmarks: the Basilica, Spoon & Cherry, Twins Stadium, U of M Campus, TCF Stadium, and (Matt's favorite), the Grain Belt Brewery sign. I used Mod Podge to adhere the prints to the window. I spread a thin layer of it on the back of each window pane and placed each print face down (so it would show through the window). The hardest part of the whole thing was probably smoothing out the paper so there weren't wrinkles or bumps. Slow and steady and it is not too hard. I used another coat of Mod Podge and let the whole thing dry. I had some photo hangers that I have randomly had for about 10 years which I nailed onto the two top corners (on the back side of the window). Voila- it was finished!


For the grand total of approximately $3.99 (the cost of the cardstock I purchased), I had a unique, fun, and pretty darn good-looking Christmas gift. Sorry if that makes me cheap Marie! My apologies for not including step-by-step photos, as I made this before the genius invent of this blog. Next time, next time. Hope you enjoyed and happy crafting!


Pin It

Lauren's Adventures in Embroidery!

Looks at these beauties!

In December, my fiance and I visited my wonderful future-in-laws in southern Missouri and we had a great time! We were showered with love and some awesome Christmas presents. These dishtowels were a Christmas present from my future grandma-in-law, and aren't they beautiful?!? I had to ask her, "how did you make these?" Turns out - embroidery!

The wonderful Grandma V took me on a trip down memory lane and showed me some of the awesome embroidery from past generations, take a look:

 and this one was my favorite! This apron featured a lady with a dress and matching undergarments! How risque! (especially because this apron is probably over 50 years old!)


Grandma V walked me through some basic stiches, which were not nearly as difficult as they looked. Here is a helpful tutorial I found on Pinterest from The Purl Bee blog (not as good as training from Grandma V, but it will do):


I decided to take a stab at embroidery when I got home from my holiday break. I cut out the N (which stands for my soon-to-be last name) using my Silhouette SD and traced it on the canvas bag. I did the basic stitch and had a pretty green N in no time. What about those purple dots? Ya, those did not turn out very well.... I still have a lot to learn!
Pin It

I am excited to learn more embroidery in months/years to come, but most of all I am excited about the wonderful memories I made learning this new hobby. I could not be more thankful to be joining such an amazing family, I am truly blessed!


That is all for now, more blogging to come!

Sunday, January 15, 2012

Welcome to our new blog!

Welcome to our new blog! This blog gives the four of us a chance to blog about what we love - crafting! Here is an introduction to the four bloggers:

Abby - The "Newby" crafter
 Hobbies include:
·          Card making
·          Home decor crafting
·          YouTube-ing
·          Volunteering
·          Diet Coke drinking

Erin - The "Wearable" crafter
 Hobbies include:
·          Jewelry making
·          Crossfit
·          Volunteering
·          Wedding DIY
·          Doggie loving

Kelsey - The "Classic" crafter
 Hobbies include:
·          Card making
·          Scrapbooking
·          Home decor crafting
·          Volunteering
·          Working out

   Lauren - The "Techy" crafter
   Hobbies include:
·          Paper crafting
·          Wedding DIY
·          Bargain hunting
·          Graphic design-ish crafts
·          Volunteering